Lesson 3.4: Theatrical Cuelists & Scenario Playback
Warning
⚠️ Draft Lesson: This lesson is currently a working draft and is undergoing practical review. Technical labs, workflows, and diagrams may be expanded and refined in upcoming revisions.
In theatrical plays, operas, dance recitals, and corporate presentations, the lighting operator does not improvise. The performance follows a strict narrative progression where every visual change is synchronized with an actor's line of dialogue, an orchestral crescendo, or a speaker entering the stage.
To manage this progression without error, professional production relies on two classic disciplines:
- The Sequential Cue List (Theatrical Stack): A structured linear list of lighting states navigated with a dedicated, single-button "GO" trigger.
- Move-in-Black (MIB): The vital discipline of repositioning motorized fixtures and changing optical gobos while the fixture’s dimmer is at zero, preventing distracting sweeps of light across the set.
In this lesson, we break down cue list mechanics, explore Move-in-Black preparation, and examine Unilighter's Theatrical Scenario Script Mode—an interface that embeds interactive cue badges directly inside the dialogue of a digital play screenplay.
1. The Anatomy of a Theatrical Cue List
In traditional theatre booths, a cue list is structured as a vertical table where every row represents an explicit visual transition:
+-------------------------------------------------------------------------------+
| Cue # | Label / Action             | Target Look  | Fade In | Fade Out| Trigger  |
+-------+----------------------------+--------------+---------+---------+----------+
| 1.0   | House Lights to Half       | Scene: House | 5.0 s   | --      | Manual GO|
| 2.0   | Opening Monologue          | Scene: Mono  | 3.0 s   | 5.0 s   | Manual GO|
| 2.5   | MIB: Position Upstage Spot | Scene: MIB_01| 0.0 s   | --      | Auto (0s)|
| 3.0   | Ghost Apparition           | Anim: Shiver | 1.5 s   | 2.0 s   | Manual GO|
| 4.0   | Act I Finale Blackout      | Scene: BO    | 0.5 s   | 0.5 s   | Manual GO|
+-------------------------------------------------------------------------------+
Key Parameter Definitions
- Cue Number: Typically indexed with decimal increments (
1.0,1.5,2.0). This allows a programmer to insert unexpected cues between existing ones during tech rehearsals without renumbering the entire prompt book. - Fade In / Fade Out (Split Fades): Incoming fixtures can fade up over a different duration than outgoing fixtures fade out. For instance, an outgoing sunset wash can take \(8.0\) seconds to fade to dark, while an incoming night moonlight spot fades up in \(3.0\) seconds.
- Delay Time: The elapsed wait period between pressing GO and the actual start of the fade transition.
- Follow / Auto-Advance: Causes the console to automatically execute the subsequent cue after a programmed time delay, without requiring a second manual press of the GO button.
2. Move-in-Black (MIB): The Discipline of Silent Preparation
One of the most jarring mistakes in amateur stage lighting is the live move: a moving head turns on at the wrong position, and the audience watches it awkwardly swing across the stage floor and actors before settling on its intended target.
Live Move (Incorrect):
Cue 1 (Dark) ───────> Cue 2 (Dimmer ON, Pan swinging across actors!) ───> Focused

Move-in-Black (Correct):
Cue 1 (Dark) ───────> Cue 1.5 (Dimmer 0%, Pan moves silently in dark) ─> Cue 2 (Dimmer Fades UP on target!)
The Rules of Move-in-Black
- Zero Dimmer: Never reposition Pan, Tilt, Zoom, Gobos, or Prisms while the luminaire’s dimmer is open, unless a visible aerial sweep is a deliberate artistic choice.
- Motor Settle Time: Physical stepper motors require time to travel and stabilize. If a moving head needs to rotate \(180^\circ\), it typically requires between \(1.0\) and \(2.5\) seconds to reach the new coordinate and stop swinging.
- Dedicated Prep Cues: In cue-stack programming, insert a preparation cue (or enable automated MIB) as soon as the fixture finishes its previous illuminated scene. This gives the fixture the entire duration of the intervening scenes to quietly reposition while dark.
3. Cue Lists in Unilighter: The Functions Widget
In Unilighter, structured show control is hosted inside the versatile Functions Widget on the Live Dashboard. Opening the widget settings allows operators to choose between two theatrical operational modes: cue-list and scenario.
3.1 Standard Sequential cue-list Mode
When set to mode: cue-list:
- Cues are displayed in a clean, vertical stack.
- The active cue is highlighted, and the container automatically scrolls smoothly to keep the active item in view.
- Transport Controls:
GO/Next ▸: Advances to the upcoming cue and executes its transition.◂ Prev: Steps backward to the previous cue in the list.|◂ First/Last ▸|: Instantly jumps to the start or finale of the production.Cue List On/OffToggle: Enables or disables cue list output, letting you rehearse cue stepping silently before taking active control of stage fixtures.
4. Theatrical Scenario Script Mode: Integrating the Screenplay
In traditional theater booths, the lighting operator is forced to juggle multiple physical surfaces:
- A heavy three-ring paper binder containing the stage manager's prompt script.
- A pen to write down director notes.
- The console’s physical GO button.
- A handheld stopwatch to time scene lengths.
If an actor forgets a line, skips two paragraphs of dialogue, or jumps ahead to the climax during a live performance, the operator can easily lose their place in the paper script and fire the wrong cue.
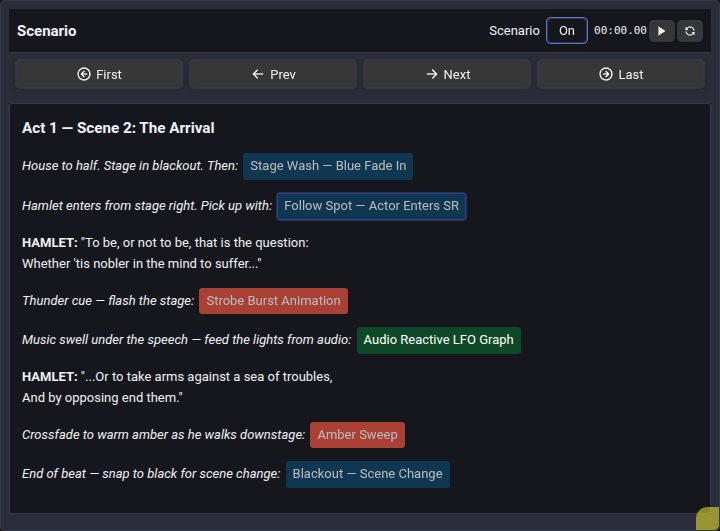
Unilighter’s Theatrical Scenario Script Mode solves this by embedding the play script directly inside the digital console:
4.1 Rich-Text Script with Embedded Functions (<function>)
Lighting designers or stage managers can paste the complete screenplay—dialogue, act/scene headings, and italicized stage directions—directly into the widget's rich text editor.
Within the dialogue, you can insert interactive, color-coded cue tokens:
- Scene Tokens (Blue): Static looks, such as Act I Sunset Wash or Blackout.
- Animation Tokens (Red): Dynamic motion, such as Lightning Storm Strobe or Candlelight Flicker.
- Node Graph Tokens (Green): Procedural audio-reactive or wave automation.
4.2 Rehearsal Stopwatch & Cue Jumping
- Built-In Digital Stopwatch: A millisecond-accurate timer (
00:00.00) sits in the widget header with Start, Pause, and Reset buttons, allowing the stage manager to monitor scene pacing during technical runs. - Direct Cue Click: If an actor skips a page of dialogue, the operator does not need to furiously hammer the GO button through ten intermediate cues. Simply clicking the cue token in the new paragraph fires that look immediately on stage.
5. Clean State Handoffs & Transition Protection
When transitioning between cues in a stack, Unilighter protects fixture parameters from unexpected resets:
+-------------------------------------------------------------------------+
| Crossfade State Handoff: Cue 1 -> Cue 2                                 |
|                                                                         |
| 1. Capture current live parameter values from running Scene 1           |
| 2. Activate Scene 2 with target parameters                              |
| 3. Smoothly interpolate from captured values to target values over fade |
| 4. Deactivate Scene 1 controls *only after* new values are asserted     |
+-------------------------------------------------------------------------+
Because Unilighter captures the exact live output state at the moment GO is pressed, fixtures glide smoothly into their new values even if the previous transition was still in flight.
6. Hands-On Lab: Setting Up a Theatrical Cue List in Unilighter
Follow this workflow to create a sequential cue list on your Live Dashboard:
Step 1: Prepare Two Foundational Scenes
- In Scenes (
/#/scenes), ensure you have at least two scenes:Act I - Daylight Living Room(Front warm wash at \(85\%\), natural window backlight).Act I - Midnight Mystery(Front warm wash at \(0\%\), cool blue moonlight downlight at \(40\%\)).
Step 2: Add a Functions Widget
- Navigate to the Live Dashboard (
/#/dashboard). - Click Add Widget and select Functions Widget.
- Open the widget settings by clicking the gear icon in its header.
- Set Mode to
cue-list. - Set the Title to
Main Theatrical Stack.
Step 3: Populate the Cue Stack
- In the configuration panel, click Add Function and select
Scene. - Add
Act I - Daylight Living Room. - Set the cue transition duration to
4000 ms(\(4.0\) seconds). - Click Add Function again and add
Act I - Midnight Mystery. - Set the transition duration to
6000 ms(\(6.0\) seconds).
Step 4: Rehearse with Transport Controls
- Toggle the Cue List ON button in the widget header.
- Click
GO(or press the bound hotkey):Act I - Daylight Living Roomfades in smoothly over \(4\) seconds. - When ready, click
GOagain: the daylight wash fades down as the cool midnight moonlight fades in over \(6\) seconds. - Notice how the active cue is highlighted and tracked automatically.
📝 Self-Assessment Quiz
Test your comprehension of theatrical cue lists and scenario playback:
- Scenario A: During a theatrical play rehearsal, a moving head spot is used in Scene 1 to light a downstage chair. It is turned off during Scene 2. In Scene 3, the chair is struck and the spot is required to illuminate an actor standing upstage left. When Cue 3 (Scene 3) fires, the audience clearly sees a bright beam of light sweep dramatically across the stage floor and actors before settling on the actor. How should this cue stack be corrected?
- A) Replace the physical DMX cable with a 5-pin XLR cable to increase transmission baud rate.
- B) Implement Move-in-Black (MIB) by programming the spot to reposition Pan and Tilt while its dimmer is at 0% during Scene 2.
- C) Switch the fixture from 16-bit high-resolution mode to 8-bit standard mode.
- D) Increase the fixture's internal DIP switch binary offset by 32 channels.
Correct Answer: B Why this is correct: Move-in-Black (MIB) ensures that automated luminaires change physical Pan, Tilt, Gobo, and Color parameters while their dimmers are closed (\(0\%\)). Pre-positioning the fixture during Scene 2 allows it to arrive silently at upstage left before fading up in Scene 3. Why other options are incorrect: XLR cabling (A) and DIP switch addressing (D) govern digital signal transmission, not artistic fixture positioning; and switching from 16-bit to 8-bit mode (C) reduces positional accuracy without preventing visible live movement.
- Scenario B: What is the primary operational advantage of Unilighter's Theatrical Scenario Script Mode over traditional printed three-ring prompt binders during a live rehearsal?
- A) Scenario mode eliminates the need for DMX interfaces by streaming light directly via Wi-Fi radio frequencies.
- B) It embeds interactive cue tokens directly inside the digital screenplay text, allowing operators to follow dialogue and click to jump instantly if actors skip lines.
- C) It automatically rewrites the playwright's dialogue using artificial intelligence to match stage lighting color temperatures.
- D) It bypasses all venue circuit breakers to deliver 100% electrical efficiency to stage dimmers.
Correct Answer: B Why this is correct: Scenario Script Mode displays the actual play text with inline, clickable cue badges. This keeps the operator's focus on the narrative and provides instant, non-linear navigation if cast members skip lines or jump ahead during rehearsal. Why other options are incorrect: Scenario mode is a software UI workflow that still streams data through standard DMX/network interfaces (A); it does not rewrite script literature (C); and it has zero connection to electrical circuit breaker safety ratings (D).
- Scenario C: Why do professional theatrical lighting designers utilize decimal cue numbering (such as
Cue 1.0,Cue 1.5,Cue 2.0) rather than strictly sequential integer numbering (Cue 1,Cue 2,Cue 3)?- A) Because DMX512 standards only recognize fractional floating-point packet addresses.
- B) Because decimal numbering allows technicians to insert new, unplanned cues between existing rehearsed cues without renumbering the entire prompt book.
- C) Because RS-485 microsecond baud rates drop if integer numbers exceed 255.
- D) Because decimal numbers automatically calculate the physical inverse square falloff distance of the cue's fixtures.
Correct Answer: B Why this is correct: During intense stage rehearsals, directors frequently add subtle intermediate looks (e.g. an actor pausing before exiting). Decimal numbering allows programmers to insert
Cue 1.2orCue 1.5betweenCue 1.0andCue 2.0without forcing the stage manager and lighting crew to renumber hundreds of subsequent cues in their scripts. Why other options are incorrect: DMX packets contain 8-bit integer channel values (A); RS-485 transmission speeds are independent of cue notation (C); and decimal cue indexing is an organizational convention, not an optical metric equation (D).