Lesson 3.5: Momentary Overrides & Flash Bump Effects
Warning
⚠️ Draft Lesson: This lesson is currently a working draft and is undergoing practical review. Technical labs, workflows, and diagrams may be expanded and refined in upcoming revisions.
During a live performance, the lighting operator must frequently inject sudden, high-energy accents: firing a blast of audience blinders on a musical beat, triggering a flash of white strobes during a theatrical lightning strike, or temporarily boosting a solo spotlight while an artist takes a guitar solo.
These visual accents are fundamentally momentary: they must fire the exact millisecond the button is pressed and vanish immediately when the button is released.
However, implementing momentary accents on stage introduces a dangerous architectural challenge: the priority conflict.
In this lesson, we examine why primitive consoles fail during momentary overrides, explore Unilighter's hierarchical Priority Layering Engine, and learn how to configure non-destructive bump buttons that punch through active scenes without corrupting underlying show states.
1. Latching vs. Momentary: Two Distinct Control Paradigms
Lighting controls operate in one of two behavioral modes:
| Control Type | Operational Behavior | Physical Analogy | Recommended Applications |
|---|---|---|---|
| Latching (Toggle) | Click once to turn ON; click a second time to turn OFF. Remains active indefinitely until toggled. | A household light switch. | Preshow looks, static act scenes, ambient color washes, looping keyframe movements. |
| Momentary (Hold / Bump) | Active only while held down. Instantly deactivates the moment the finger or key is released. | A piano key or momentary doorbell. | Audience blinders, lightning strikes, kick-drum accents, solo performer punch-ins. |

2. The Priority Problem on Legacy Desks
To understand why Unilighter was engineered with an explicit priority arbiter, observe what happens on an entry-level or legacy lighting console:
Legacy Console: Destructive Overwrite Failure
1. Scene 1 is running: Downstage Wash is glowing warm amber at 50% intensity.
2. Operator presses "Blinder Flash" button: Channels 1–8 jump to 100% white.
3. Operator releases "Blinder Flash" button.
4. Problem: Channels 1–8 do NOT return to 50% amber. They either stay stuck at 100%,
   or plunge into total blackness because the bump button destructively overwrote the channel memory!
5. Result: The operator must frantically reload Scene 1 to restore the stage look.
On primitive consoles that lack multi-layered signal arbitration, channels have no memory of what was running before the bump. Pressing a flash button destroys the underlying state.
3. Unilighter's Numerical Priority Architecture
Unilighter solves this problem through an explicit, real-time Priority Layering Engine.
Every control source in the console—scenes, keyframe tracks, node graphs, live dashboard faders, and flash buttons—outputs its parameter values alongside an explicit integer priority. When multiple sources attempt to control the exact same DMX channel simultaneously, the highest priority value wins:
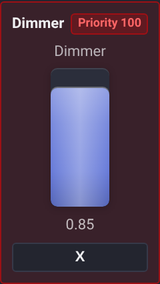
Standard Priority Hierarchy
| Priority Level | Name / Source | Functional Role on Stage |
|---|---|---|
-10 |
Background | Idle default state when no active cues or animations are playing. |
0 |
Normal (Default) | Standard baseline priority for static Scenes and cue lists. |
5 – 15 |
Layered Show Functions | Background chases, secondary movement timelines, or subtle color pulses running on top of static looks. |
20 – 50 |
Momentary Bump / Flash | High-priority momentary overrides (blinders, white strobes, solo accents). |
100 |
Manual Operator Control (PRIORITIES.manual) |
When an operator touches a physical fader, knob, or XY pad on the Live Dashboard. Takes precedence over automated show cues. Marked with a red border. |
665 – 667 |
System / Solo Preview (PRIORITIES.system) |
Isolated fixture editing and focus preview. Temporarily suppresses live show output for stage checks. |
1000+ |
Venue Safety & Worklights | Hardwired architectural safety overrides, smoke machine interlocks, and emergency building worklights. |
4. The Mechanics of Non-Destructive Bump & Release
Because priorities are evaluated dynamically on every single 44 Hz DMX frame, momentary overrides in Unilighter are completely non-destructive:
+-------------------------------------------------------------------------+
| Dynamic Priority Arbitration Timeline                                   |
|                                                                         |
| Layer 0 (Normal): [ Scene: "Moody Indigo Wash" (Dimmer: 40%) ] -------->|
|                                                                         |
| Layer 25 (Bump):             [ HOLD: Blinder Burst (100%) ]             |
|                              ▼                            ▼             |
| DMX Output:       [ 40% ] ──> [ 100% Full White Punch ] ─> [ 40% Restored!]|
|                               ▲                           ▲             |
|                            Button                      Button           |
|                            Pressed                    Released          |
+-------------------------------------------------------------------------+- Prior to Press: The ambient scene runs at priority
0. The DMX output is \(40\%\). - On Button Press (
@hold): The momentary bump scene is asserted at priority25. Because \(25 > 0\), the priority arbiter immediately routes \(100\%\) white to the DMX line. The underlying scene at priority0continues running in the background without interruption. - On Button Release (
@unhold): The bump scene is deactivated. Its priority25claim is instantly removed from the arbiter. The console falls back to the highest remaining priority source—the ambient scene at priority0—instantly and seamlessly restoring the \(40\%\) indigo wash.
The operator never has to reload, re-trigger, or repair the running cue.
5. Hold Mode in the Functions Widget
In Unilighter, you can convert any button inside a Functions Widget into a momentary flash button with a single setting:
- Open the widget settings for a Functions Widget on your Live Dashboard.
- Toggle the Hold Mode switch to active (
hold: true). - Notice the visual feedback: all function buttons in the widget immediately render with a distinct dashed border (
border-style: dashed), signaling to the operator that these are momentary controls rather than latching toggles. - When you click and hold the mouse button (or press and hold a bound MIDI pad or keyboard key), the function fires. The moment you release, it deactivates.
Tip
Tactile MIDI Mapping: Momentary bump buttons are ideally bound to velocity-sensitive pads on physical MIDI controllers (such as an Akai APC, Novation Launchpad, or MIDI drum pad). The controller sends NoteOn when tapped and NoteOff when released, providing zero-latency tactile punch on stage.
6. Hands-On Lab: Setting Up a Non-Destructive Blinder Bump
Follow this practical lab to build an audience blinder bump over a running cue:
Step 1: Create the Blinder Scene with Higher Priority
- Navigate to Scenes (
/#/scenes) and click Create Scene. - Name the scene
FX - Blinder Punch. - Select your blinder or front wash fixtures.
- Set
Dimmerto100%andColorto warm open white (\(3200\,\text{K}\) or \(100\%\) white). - In the scene settings, set Fade Time to
0 ms(instant strike). - Set Priority to
25(ensuring it outranks standard scenes at priority0). - Click Save.
Step 2: Configure a Functions Widget in Hold Mode
- Go to the Live Dashboard (
/#/dashboard). - Add a new Functions Widget.
- Open its configuration settings and name it
Momentary Bump FX. - Turn on Hold Mode (
hold: true). - Click Add Function, select
Scene, and chooseFX - Blinder Punch. - Set its button color to amber or gold. Notice that the button displays with a dashed border.
Step 3: Test Non-Destructive Playback
- Start any ambient show scene or cue list at priority
0(e.g. an indigo wash at \(30\%\)). - Click and hold the
FX - Blinder Punchbutton: the stage explodes into blinding white light at \(100\%\) intensity. - Release the mouse button: the blinders extinguish instantly, and the stage returns seamlessly to the \(30\%\) indigo wash.
📝 Self-Assessment Quiz
Test your mastery of momentary controls and control priorities:
- Scenario A: An operator is running a slow 10-second theatrical cue list where the main stage scene runs at standard priority 0. During an unexpected drum fill, the operator hits an audience blinder button programmed at priority 0. Why does the blinder fail to illuminate the room?
- A) Because DMX512 transceivers cannot transmit packets when two scenes share identical priority numbers.
- B) Because when two sources share the exact same priority 0, the existing running scene maintains control and the new signal cannot cleanly supersede it without higher priority.
- C) Because audience blinders require high-voltage 3-phase AC power that cannot be triggered by software widgets.
- D) Because the console's binary DIP switch 10 automatically isolates channels whenever a flash button is touched.
Correct Answer: B Why this is correct: Unilighter’s priority arbiter selects the highest numerical priority. If both the running cue and the bump button operate at the same baseline priority (
0), neither has authority over the other, leading to conflicting or suppressed signals. Momentary overrides should be set to higher priority (e.g.20–50) so they cleanly punch over baseline cues. Why other options are incorrect: DMX transceivers broadcast the single resolved DMX stream calculated by the software regardless of internal priorities (A); 3-phase power distribution is electrical utility infrastructure, not software signal logic (C); and DIP switch 10 is a physical fixture setting, not an automated software interlock (D).
- Scenario B: How does Unilighter visually communicate to an operator that a function button on the Live Dashboard is operating in momentary Hold Mode rather than standard latching Toggle Mode?
- A) The button flashes continuously between neon green and red at 44 Hz.
- B) The button displays a distinct dashed border instead of a solid border.
- C) The button turns invisible until the operator hovers their mouse cursor directly over it.
- D) The button plays an audible warning chime through the console’s audio output.
Correct Answer: B Why this is correct: In Unilighter’s
FunctionsWidget, enabling Hold Mode switches the button styling to a dashed border (border-style: dashed), providing clear visual feedback that pressing the button activates a momentary action rather than a permanent latching state. Why other options are incorrect: Rapidly flashing colors (A) would cause severe visual distraction during a live show; hidden buttons (C) hinder live operation; and console audio chimes (D) do not exist for dashboard widgets.
- Scenario C: While an automated keyframe animation is running on stage, the lighting technician grabs a manual fader on a Device Control Widget and pulls the dimmer down to 10% to prevent camera glare. What priority level does this manual adjustment assume in Unilighter, and what visual indicator appears on the widget?
- A) Priority 0 with a green border indicating ambient tracking.
- B) Priority 100 (
PRIORITIES.manual) with a red border (has-control) indicating active manual operator lock. - C) Priority 666 (
PRIORITIES.system) with an inverted DIP switch diagram. - D) Priority -10 with a yellow inconsistency badge.
Correct Answer: B Why this is correct: Touching any live Device Control widget fader, knob, or XY pad asserts manual operator control at Priority 100 (
PRIORITIES.manual). The control is highlighted with a red border (has-control) to indicate that manual override is active, which outranks automated show cues until the release button (X) is clicked. Why other options are incorrect: Priority 0 is the baseline for automated scenes, not manual overrides (A); Priority 666 is reserved for solo system editing and stage focus checks (C); and Priority -10 is the idle background default, while yellow badges indicate conflicting parameter values across tagged groups (D).