Lesson 3.3: Dynamic Motion: Step Sequences & Keyframe Timelines
Warning
⚠️ Draft Lesson: This lesson is currently a working draft and is undergoing practical review. Technical labs, workflows, and diagrams may be expanded and refined in upcoming revisions.
Static scenes establish mood and environment, but live performance often requires movement: a rhythmic color chase synchronized to the kick drum, an alternating odd/even strobe pulse, or a slow, sweeping pan of moving heads tracking across an auditorium.
To program motion effectively, you must understand the distinction between two fundamental animation paradigms:
- Discrete Step Sequences (Chases): A series of distinct static lighting states that hold for a specified duration before stepping or crossfading to the next look.
- Continuous Keyframe Timelines: Parameter values modulated continuously over time using mathematical interpolation curves and easing functions.
In this lesson, we explore both engines in Unilighter: the Step Animation Editor for rhythmic chases, and the Keyframe Animation Editor for multi-track cinematic motion.
1. Discrete vs. Continuous Motion: Choosing the Right Tool
| Feature | Step Sequencer (StepAnimation) |
Keyframe Timeline (KeyframeAnimation) |
|---|---|---|
| Data Model | A sequence of discrete scenes (IAnimationStep) with hold and fade times. |
Multi-track timeline where parameters glide between keyframe points. |
| Motion Character | Punchy, rhythmic, stepped, or segmented crossfades. | Smooth, continuous, organic trajectories (Pan/Tilt, color breathing). |
| Typical Applications | Marquee chasers, odd/even strobe hops, drum beat accents, color cycling. | Synchronized beam sweeps, theatrical sunrise fades, complex ballyhoos. |
| Timing Base | Milliseconds (ms) or locked to 1 musical beat (On Beat). |
Time mode (ms) or Beat mode with rate multipliers (2x, 1x, /2, /4, /8). |
| Editing Complexity | High speed: build two or three scenes and define the cycle order. | High precision: micro-adjust individual curve tangents and parameter timings. |
2. The Step Animation Engine: Rhythmic Chases
The Step Animation Editor allows you to assemble scenes into cyclic or one-shot chases.
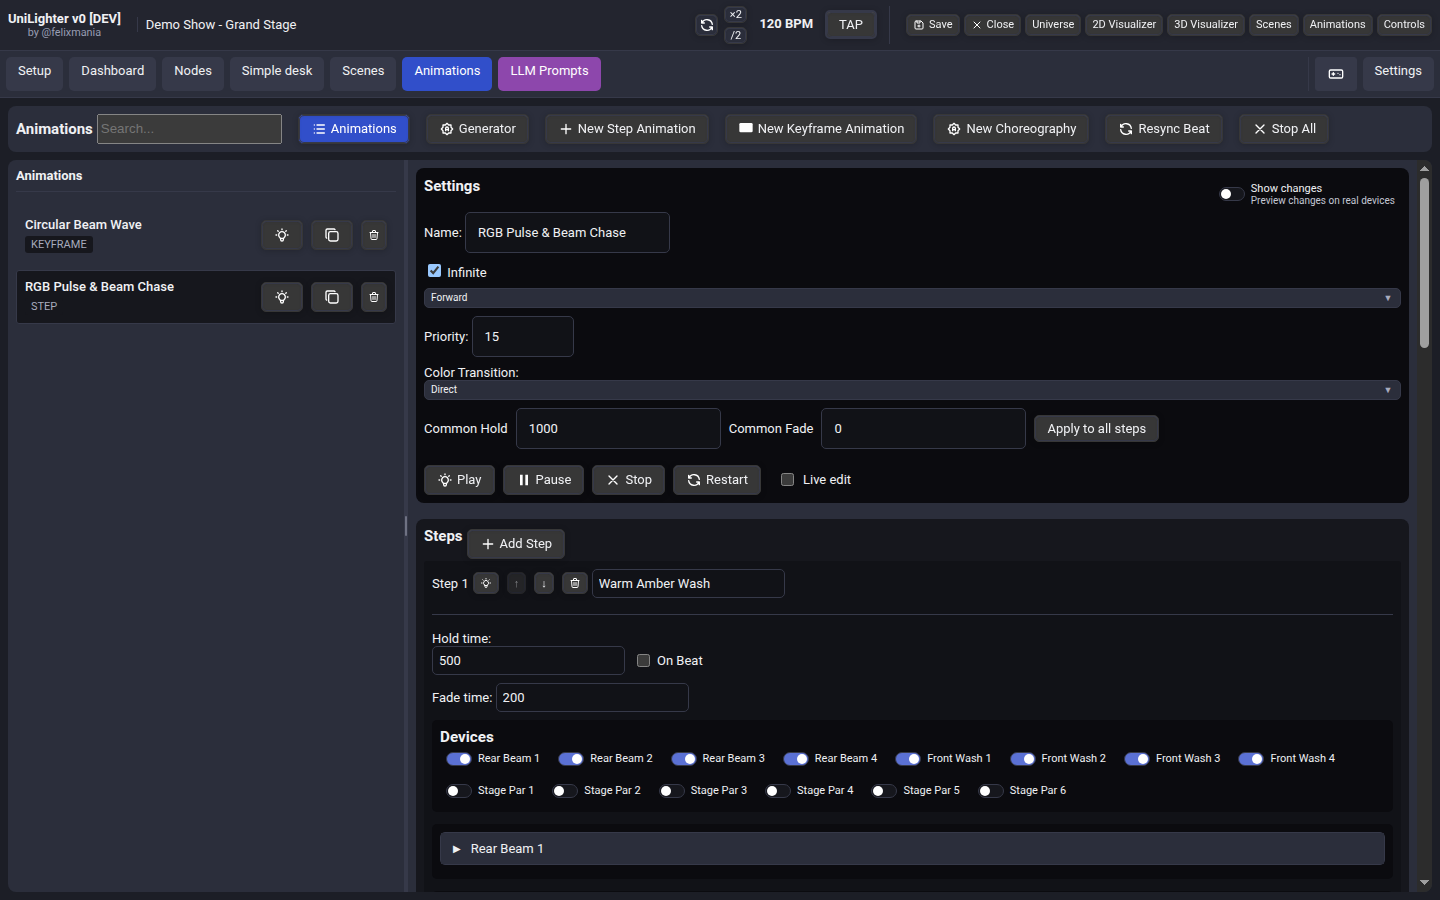
2.1 Anatomy of an Animation Step
Each step in the sequence contains three primary parameters:
- Value (Embedded Scene): The specific fixture states (dimmer levels, colors, positions) active during this step. Untouched fixtures pass through unaffected.
- Hold Time (
ms): The duration the step remains completely static after arriving at its target values. - Fade Time (
ms): The transition duration taken to morph from the previous step’s values into this step.- Setting
Fade = 0 mscreates a crisp, rhythmic cut (ideal for strobes, blinders, and electronic music). - Setting
Fade = 500 mswithHold = 500 mscreates a gentle, wave-like morph between states.
- Setting
2.2 Beat Synchronization (On Beat)
Instead of manually calculating millisecond durations whenever the song tempo changes, checking the On Beat option locks the step's hold time directly to one musical beat from Unilighter's master BPM clock.
When the DJ or band accelerates from \(120\,\text{BPM}\) (\(500\,\text{ms/beat}\)) to \(130\,\text{BPM}\) (\(461\,\text{ms/beat}\)), the chase speeds up in lockstep without requiring manual adjustment.
2.3 Playback Order Modes
The playback engine iterates through steps using four distinct routing orders:
- Forward: Sequences strictly from start to finish (
1 → 2 → 3 → 4 → 1). - Reverse: Sequences backward (
4 → 3 → 2 → 1 → 4), ideal for reversing beam travel direction. - Ping-Pong: Bounces back and forth smoothly (
1 → 2 → 3 → 4 → 3 → 2 → 1), creating a natural pendulum or scanning effect. - Random: Picks random steps continuously, creating organic, non-repeating sparkle or chaotic lightning sequences.
3. The Keyframe Animation Engine: Fluid Trajectories
For fluid, continuous motion—such as moving head pan/tilt figures or gradual color shifts—the Keyframe Animation Editor provides a professional multi-track timeline interface.
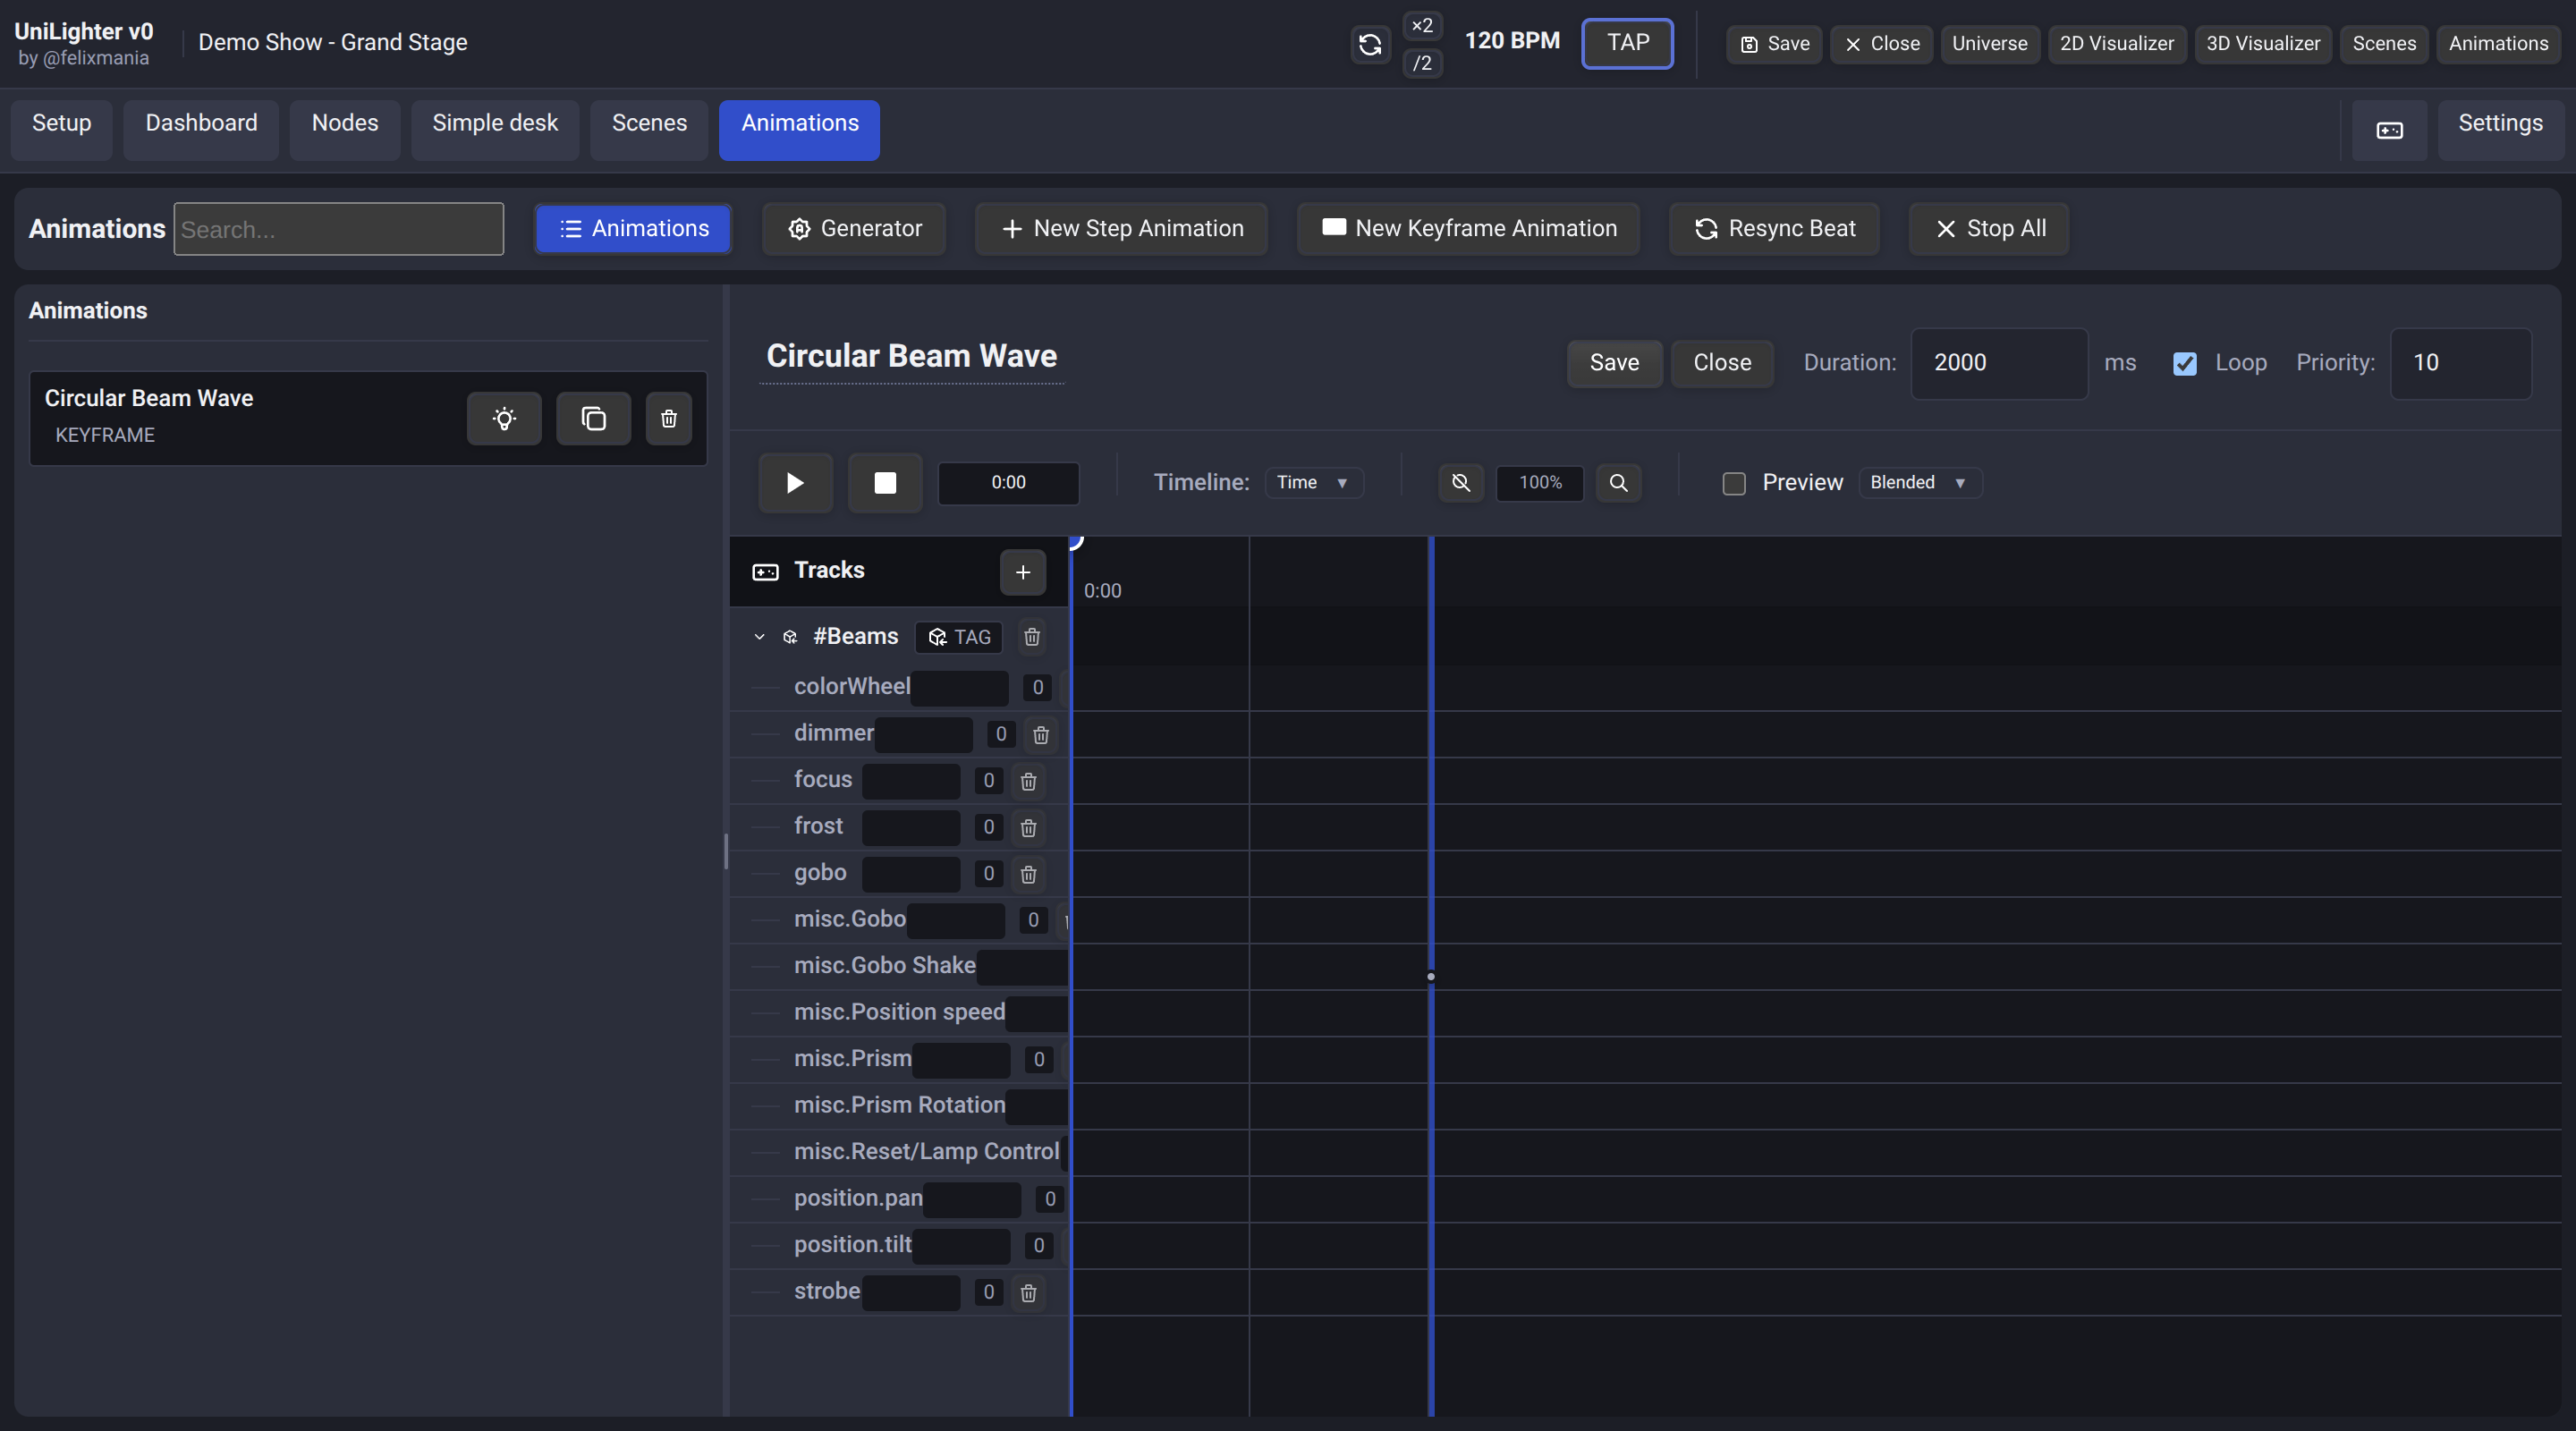
3.1 Tracks, Channels & Shapes
The timeline is structured into hierarchical tracks:
- Device Tracks: Target a specific physical luminaire.
- Tag Tracks: Target an entire semantic tag group (e.g.,
#backline-spots), modulating all tagged fixtures simultaneously. - Parameter Channels: Sub-rows for specific attributes:
Dimmer,Pan,Tilt,Color (Hue, Saturation, Value),Zoom,Focus, etc.
Keyframe markers use distinct geometric shapes for rapid visual identification:
- Diamonds (\(\diamondsuit\)): Dimmer and general intensity controls.
- Circles (\(\bigcirc\)): Color channels (Hue, Saturation, Value).
- Squares (\(\square\)): Motorized Pan and Tilt spatial coordinates.
- Triangles (\(\triangle\)): Rotational and indexing parameters (Gobos, Prisms).
The interior visual fill of each marker reflects its stored numerical value (empty for \(0\), solid bright fill for full value).
3.2 Time Mode vs. Beat Mode & Rate Multipliers
The timeline can operate in two timebases:
- Time Mode (
ms): Operates on absolute wall-clock milliseconds. Ideal for fixed-duration theatrical cues, dramatic curtain rises, or video-synced stings. - Beat Mode (
beats): The horizontal timeline grid represents musical beats rather than seconds.
When in Beat mode, you can change the global BPM Multiplier dropdown: \($\text{Available Multipliers}: [\,2\times,\; 1\times,\; /2,\; /4,\; /8\,]\)$
- Setting
2xdoubles the playback speed relative to the project tempo (e.g. 16th-note sweeps). - Setting
/4stretches a 4-beat pattern across 16 bars for a long, slow ambient build-up, without needing to move a single keyframe marker.
4. Interpolation Curves & Mechanical Motor Physics
One of the most frequent mistakes made by novice programmers is ignoring the physical mechanics of automated luminaires.
A moving head is not a weightless software pixel. It consists of an aluminum yoke, glass lenses, optical wheels, circuit boards, and internal power supplies weighing anywhere from \(5\,\text{kg}\) to \(35\,\text{kg}\). This physical mass is driven by high-torque stepper motors via rubber toothed belts.
+-------------------------------------------------------------------------+
| Interpolation Curves Comparison                                         |
|                                                                         |
| Linear: Constant velocity -> sharp jerk at start and stop               |
| 100% ┌───────────────────────/                                          |
|      │                      /                                           |
|   0% └─────────────────────/                                            |
|                                                                         |
| Ease In-Out: Gradual acceleration -> zero jerk -> smooth stop           |
| 100% ┌───────────────────────.---                                       |
|      │                      /                                           |
|   0% └───────────────---'                                               |
+-------------------------------------------------------------------------+
The Pitfalls of Linear Interpolation
If you place two keyframes with a Linear transition:
- At timestamp \(t_0\), the console immediately demands maximum acceleration from the motor.
- At timestamp \(t_1\), the motor stops instantly at maximum velocity.
On the physical stage, this causes:
- Mechanical Jerk & Truss Wobble: The sudden torque snaps the truss pipe, causing adjacent lights and microphones to shake visibly.
- Belt Slippage & Step Loss: The stepper motor can skip teeth on the drive belt, knocking the fixture out of physical calibration until it re-indexes.
- Ugly Visual Motion: The light appears robotic and mechanical rather than graceful.
The Power of Easing Curves
By clicking the transition line between keyframes and selecting Ease In-Out, Sine, or Cubic, Unilighter applies an S-curve easing equation:
- The motor begins with gentle acceleration, ramps up to peak travel speed through the midsection of the move, and decelerates smoothly as it settles into the final focus mark.
- The resulting motion looks cinematic, fluid, and polished, while reducing mechanical stress on fixture drive mechanisms.
Immediate / Step Interpolation
When a parameter must hold its exact state until a specific instant and then jump instantaneously without any crossfade (for example, indexing a Gobo wheel or triggering a strobe flash), select the Step (Immediate) curve. The previous key value is held steadily right up to the next keyframe marker.
5. Hands-On Lab: Building a Smooth Pan Sweep in Unilighter
Follow these steps to create an automated, tempo-synced moving head sweep:
Step 1: Open the Keyframe Animation Editor
- In the console navigation menu, select Animations (
/#/animations). - Click Create Animation and choose Keyframe Animation.
- Name your animation
Symmetric Beam Fan.
Step 2: Configure Timeline Parameters
- In the editor header, switch the timeline mode from Time (ms) to Beat.
- Set the loop duration to
8 beats. - Set the BPM Multiplier to
1x.
Step 3: Add Tracks and Keyframes
- Click Add Track and choose your
#backline-spotstag track. - Under the track parameters, enable the Pan channel.
- At beat
0, double-click on the Pan row to create a keyframe. Set the value to30%(pointing stage left). - At beat
4, double-click on the Pan row to create a keyframe. Set the value to70%(pointing stage right). - At beat
8, double-click to create a final keyframe and set it back to30%.
Step 4: Apply Easing
- Click the transition span between beat
0and beat4. - In the transition popup, select Ease In-Out.
- Repeat for the span between beat
4and beat8. - Press Play in the transport bar: the beam smoothly sweeps back and forth across the stage, gently decelerating at each turn.
📝 Self-Assessment Quiz
Test your understanding of dynamic animation architectures:
- Scenario A: You are designing a high-speed alternating strobe chase across four audience blinders for a fast-paced electronic music track. In the Step Animation Editor, you notice that the blinders look sluggish and soft instead of delivering punchy, instant impacts. Which adjustment will fix this?
- A) Set each step's Fade Time to 0 ms so that intensity snaps instantaneously between steps.
- B) Increase the DMX line terminator resistance from 120 ohms to 480 ohms to accelerate serial bit transmission.
- C) Switch the playback order mode from Forward to Random to double the frame refresh rate.
- D) Lower the AC mains utility voltage from 230V to 110V to reduce LED driver latency.
Correct Answer: A Why this is correct: A non-zero Fade Time forces the engine to crossfade fixture dimmers gradually between steps. Setting Fade Time to 0 ms eliminates the crossfade, producing crisp, instantaneous on/off cuts essential for punchy strobe effects. Why other options are incorrect: DMX line termination (B) controls electrical wave reflections and cannot alter software crossfade timings; Random playback order (C) scrambles step sequences without altering frame rate; and altering mains AC voltage (D) damages power supplies and is dangerous.
- Scenario B: Why should lighting programmers avoid using strictly linear interpolation curves when commanding large, heavy moving heads through wide pan/tilt sweeps?
- A) Because linear interpolation violates the ANSI E1.11 DMX512 serial baud rate specification.
- B) Because linear curves demand instantaneous acceleration and deceleration, causing physical mechanical jerk, truss vibration, and premature motor wear.
- C) Because moving head fixtures can only process logarithmic mathematical functions in their internal firmware.
- D) Because linear curves cause the LED emitter to overheat by drawing double the rated amperage during the move.
Correct Answer: B Why this is correct: Automated moving heads have physical mass. Linear transitions produce instantaneous velocity changes at keyframe boundaries, causing sudden mechanical torque that rattles trusses, stresses belts, and risks losing motor calibration. S-curve easing (Ease In-Out) produces smooth acceleration and deceleration. Why other options are incorrect: DMX512 transmission timing is independent of software interpolation mathematics (A); fixture firmware accepts standard 8-bit or 16-bit position integers regardless of console curve shape (C); and stepper motor movement curves do not alter the electrical current drawn by optical LED emitters (D).
- Scenario C: A programmer built an 8-beat keyframe pan sweep that looks perfect during an acoustic rehearsal at 90 BPM. During the live performance, the artist plays an energetic version of the song at 140 BPM, and the sweep feels too slow across the musical phrasing. In Unilighter's Keyframe Animation Editor, how can the operator immediately double the playback speed without manually dragging individual keyframe markers?
- A) Invert the fixture's DMX DIP switch 1 to double the internal stepper motor gear ratio.
- B) In Beat mode, switch the BPM Multiplier from 1x to 2x.
- C) Switch the Simple Desk into manual override mode at priority 666.
- D) Re-address the fixture footprint to consume 16-bit fine channels instead of 8-bit coarse channels.
Correct Answer: B Why this is correct: In Beat mode, the BPM Multiplier dropdown (
2x,1x,/2,/4,/8) scales the playback tempo relative to the project BPM clock instantly, doubling the speed without modifying any keyframe timestamps. Why other options are incorrect: Hardware DIP switches set base DMX addresses, not motor gear ratios (A); Simple Desk at priority 666 is a manual test override that halts automated cue playback (C); and changing channel resolution from 8-bit to 16-bit affects positioning granularity, not playback speed (D).