The Keyframe Animation Editor is Unilighter's multi-track timeline for designing dynamic lighting sequences, continuous pan/tilt movements, fluid color gradients, and tempo-locked parameter sweeps.
⏱️ Timeline Modes & Tempo Synchronization
Animations can run in either Time or Beat mode:
- Time Mode (
ms): Operates on a standard millisecond and second timeline. Ideal for fixed-duration theatrical cues, cinematic fades, or standalone sequences. - Beat Mode (
beats): Synchronizes playback directly with the project BPM. In this mode, timeline intervals represent musical beats rather than seconds. - BPM Multipliers: When running in Beat mode, you can scale playback using the BPM dropdown (
8x,4x,2x,1x,/2,/4,/8). This lets you turn the same programmed pattern into a rapid accent or stretch it across a long musical phrase without moving individual keyframes. - Mode Switching: Switching between Time and Beat automatically rescales existing keyframes (1 second maps to 1 beat) to maintain your layout.
Playback uses elapsed time independently of the project's frame rate. For example, a 16-beat loop at 120 BPM and 1x lasts 8 seconds after its next-beat launch wait. Runtime playback and editor previews retain any elapsed remainder at a loop boundary, so delayed updates do not restart the cycle late. Changing BPM preserves the current beat position, including while paused.
The Advanced settings control whether computer sleep freezes or advances playback time in an updated Unilighter Desktop shell.
Prepare fixtures before playback
Dark Prep is enabled by default for keyframe animations. It sends the starting movement, wheel and optical targets to dark fixtures while the timeline waits. Preparation Time (ms) defaults to 0: beat animations use their usual wait for the next beat, and time animations start immediately. A positive value holds the starting playhead position for that interval; beat animations then start on the first eligible beat. Turn Dark Prep off to disable both preparation and its extra interval.
Fixtures need a physical Dimmer channel. Preparation never forces a blackout or guarantees mechanical readiness. In the editor, output still requires Preview. See Dark Prep for controls, priority behavior and Cue List look-ahead.
🎚️ Tracks & Channels
Animations are organized by Device Tracks and Tag Tracks:
- Device Tracks: Target a specific physical fixture in the patch.
- Tag Tracks: Target all fixtures sharing a specific tag (e.g.,
#wash,#beams). - Parameter Channels: Each track can contain dedicated sub-tracks for fixture parameters, such as
Dimmer,Pan,Tilt,Color (Hue, Saturation, Value),Strobe,Gobo,Focus,Frost,Zoom,Amber, andUV.
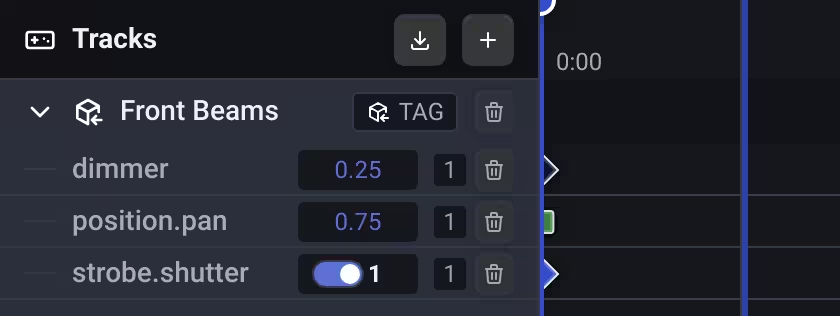
Each parameter channel displays a visual timeline row along with an interactive value control on the left that displays the current evaluated parameter at the playhead. Numeric readouts keep their editing space when names are long; hover a shortened name to read it in full. Shutter uses an Open/Closed switch instead of a numeric field.
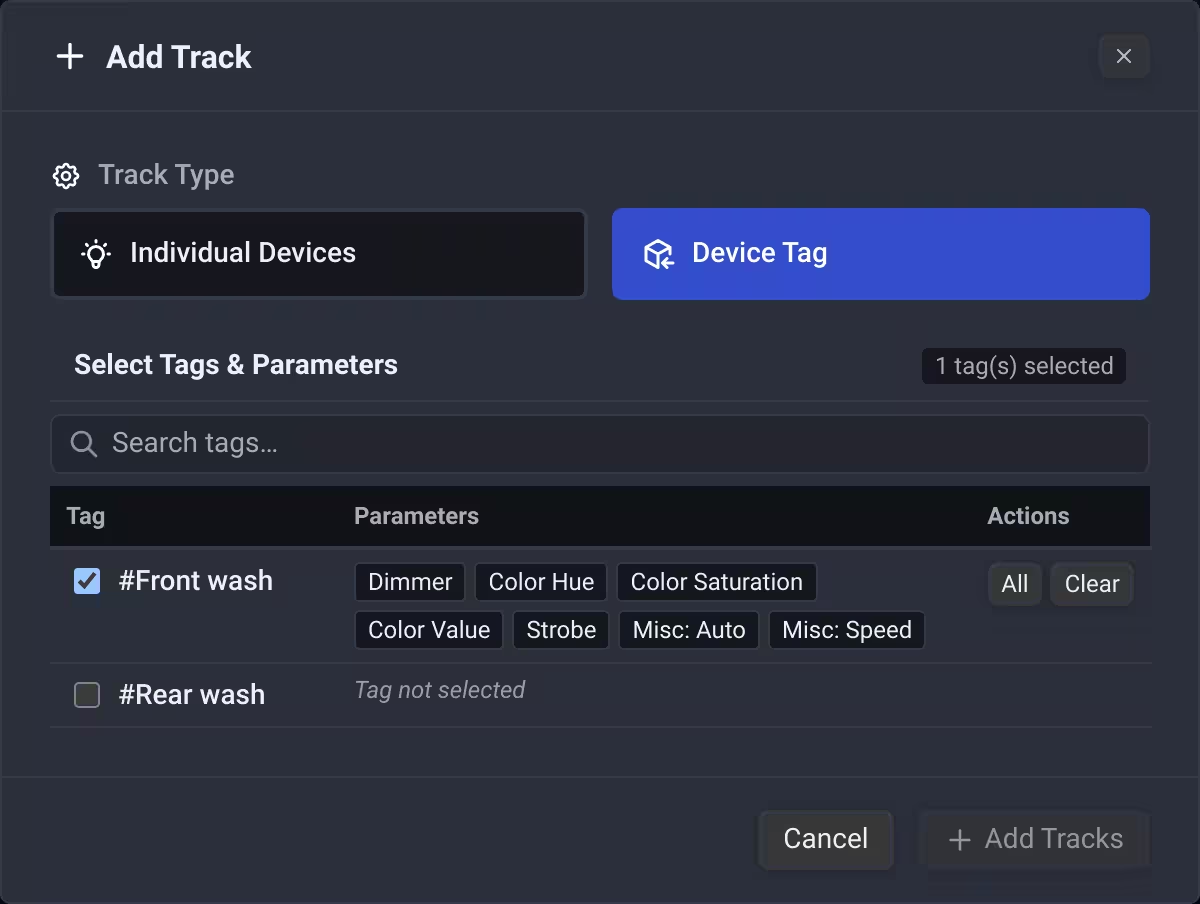
When adding device or tag tracks, the parameter picker groups controls by type, starting with Dimmer. Within each parameter, Shared comes first, followed by heads in numeric order: H0, H1, H2, and so on. Custom head names keep the same head-number order. Miscellaneous parameters appear after the main controls.
Use Search devices… or Search tags… in the track picker to narrow the list. Selected targets and parameters remain selected when hidden by the search; clear the field to see them again.
Existing projects and Raw wheel values
Opening an older project preserves its wheel selections and Boolean On/Off keys. An old Color Wheel zero that meant Unassigned remains a preset selection; an explicitly saved Raw DMX zero remains physical zero. On a wheel without presets, an old Custom DMX zero also remains physical zero. These adjustments apply to additional heads and wheels and to scenes embedded in step animations.
On wheels with Fine channels, older Custom DMX values retain their original coarse-byte output when converted to the new full-resolution Raw range.
Historical Raw misc snapshots, including Gobo Shake, retain their physical output with reversed and Fine channels. This applies to stored requests, scenes and keys, including tag members added later. Touching a stored scene control preserves that output; editing its value explicitly adopts the current control range.
Older tag tracks retain per-fixture Boolean behavior, including fixtures with Fine channels and fixtures that join the tag later. Scene imports and newly created controls use physical DMX values. Gobo Raw DMX is a separate numeric animation parameter; preset indices remain stepped.
Fast Device Track Setup
When adding a device track, the selector carries the parameter choices from the previously selected fixture to the next fixture. Only matching parameters that exist on the new fixture are selected, which is useful for consecutive fixtures with similar profiles.
- Hold Shift, Ctrl, or ⌘ while selecting a fixture to select all of its available parameters.
- Hold Alt to start the fixture with no inherited parameters and choose the channels manually.
- You can still adjust the parameter checkboxes for each fixture before clicking Add Tracks.
💎 Working with Keyframes
Keyframes represent target parameter values at specific points in time. Unilighter interpolates between them smoothly at the console's frame rate.
Keyframe Visuals
- Shapes: Parameter types use distinct shapes for quick identification—diamonds for dimmers and general controls, circles for color channels, squares for pan/tilt positions, and triangles for rotation.
- Fill Indicators: The visual fill level inside each keyframe reflects its stored numerical value.
Creating & Editing Keyframes
- Double-Click Creation: Double-clicking any empty spot on a channel row creates a keyframe at that timestamp, automatically selects it, and highlights the channel's value box for immediate typing.
- Selection & Direct Input: Clicking a keyframe selects it, snaps the playhead to its timestamp, and focuses the channel value field. Typing keeps a draft until Enter or leaving the field; arrow steps update the keyframe immediately.
- Creating via Value Field: When no keyframe is selected on a channel, editing its value field creates or updates a keyframe at the current playhead position. Pressing
Entercommits the value.
Shutter keyframes
Shutter has two states: closed (0) and open (1). Click or tap its switch to create or update a keyframe at the playhead, or change it in the keyframe value dialog and click Save. Cancel leaves that key unchanged. Double-clicking an empty Shutter timeline row creates an open keyframe (1), and Shutter changes remain stepped rather than fading between states.
Moving or copying a numeric key into a Shutter channel converts values below 0.5 to closed and values of 0.5 or above to open. Opening an older project preserves stored values until you explicitly edit them.
Multi-Channel Value Editing
You can edit multiple channel values simultaneously:
- Hold Shift for a range or Ctrl/⌘ to add or remove individual channel value controls. You can also click and drag across value fields to select a range.
- Confirming a typed value in any selected input applies it to all selected channels at the playhead position. Arrow steps apply immediately, starting from the current draft.
- Click or tap an already selected Shutter switch to apply its new state to the selected group. Space also toggles a focused switch. Modifier clicks select controls without changing their values; pressing an unselected switch selects only that channel.
📦 Multi-Track Selection, Movement & Duplication
The editor supports advanced multi-selection and drag-and-drop workflows for managing large groups of keyframes across multiple tracks:
- Box Selection (Marquee): Click and drag on any empty timeline area to draw a selection rectangle. All keyframes within the box across multiple tracks will be selected. Hold
Shiftwhile dragging to add to your existing selection. - Shift-Click: Click individual keyframes while holding
Shiftto toggle them into or out of the selection. - Moving Keyframe Packs: Dragging a selected group of keyframes moves the entire pack along the timeline. If you drag the pack vertically and drop it onto another channel row, the keyframes shift across channels while preserving their relative time spacing.
- Duplicate with Ctrl / Cmd: Hold
Ctrl(orCmdon macOS) while dragging a selection to duplicate the entire keyframe pack. The original keyframes stay in place, and the duplicates are placed at the target timestamp and channel. - Deleting: Press
Deleteoutside numeric fields to remove the selected keyframes. While typing in a numeric field,Deleteedits its text instead. - Deselection: Outside a numeric input, press
Escapeor click on an empty timeline area to clear the keyframe selection and reset channel value multi-select. Inside a numeric input,Escapeonly cancels its unconfirmed text.
📈 Transitions & Easing Curves
The span between two consecutive keyframes defines the interpolation curve between their values:
- Editing Transitions: Clicking the transition line between two keyframes opens the Transition Selector popup.
- Available Curves: Choose from
Linear,Ease In,Ease Out,Ease In-Out,Step(instant jump/hold),Sine,Cubic, and other easing functions. - Default Transition: When you pick a transition curve, the editor remembers it and automatically applies it to newly created keyframes.
👑 The Master Track
At the top of the timeline sits the Master Track, which provides an aggregate overview of your entire animation:
- Synchronized Markers: Displays aggregate markers wherever keyframes exist on any track below.
- Inspection Tooltips: Hovering over a master keyframe displays a tooltip listing every channel and value set at that exact timestamp.
- Global Time Shift: Dragging a master keyframe moves all underlying keyframes at that timestamp together, keeping complex multi-fixture cues aligned.
- Batch Deletion: Double-clicking a master keyframe opens a prompt to delete all keyframes across all tracks at that time.
🎬 Live Preview & Playback
- Play / Pause: Press
Spaceor click the Play button to preview the animation timeline in real time. - Preview Toggle: Enable the Preview checkbox to stream the animation's live output to the DMX engine and 3D visualizer.
- Preview Modes:
- Blended: Evaluates the animation on top of your currently active show scenes and stage output.
- Isolated: Mutes other active scenes and outputs only the current animation for isolated tweaking.
⌨️ Keyboard Shortcuts Reference
| Shortcut | Action |
|---|---|
| Space | Play / Pause animation playback; toggle a focused Shutter switch |
| Delete | Delete selected keyframes; inside a numeric field, edit its text |
| Escape | Cancel a numeric draft; outside value controls, deselect keyframes and clear channel multi-select |
| Click keyframe | Select keyframe, seek playhead to its time, and focus value field |
| Shift + Click keyframe | Add / remove keyframe from selection |
| Drag empty timeline | Box-select (marquee) keyframes across tracks |
| Shift + Drag empty timeline | Add keyframes within marquee box to active selection |
| Drag selected keyframes | Move keyframe pack across time and channels |
| Ctrl / Cmd + Drag selected | Duplicate keyframe pack and place copies on target time/channel |
| Double-click channel row | Create keyframe at clicked position and focus value input |
| Enter in value field | Commit value to selected keyframe or create keyframe at playhead |
| Shift / Ctrl + Click value fields | Multi-select channel value inputs for simultaneous batch editing |
| Click transition span | Open transition easing curve selector |
| Ctrl / Cmd + Mouse Wheel | Zoom timeline in / out |
Import a scene at the playhead
Use the scene import action to select a scene and choose which fixtures and channels to include at the current playhead. Nearby keys remain intact rather than being replaced merely because they are close in time.
Imported Color Wheel, Gobo and misc Boolean channels preserve the scene's physical output. Literal DMX zero stays zero, and fine-channel wheel values retain their full resolution. Wheel presets remain preset selections; misc values use physical DMX units, with Boolean On at the fixture's full maximum. These values survive saving, reopening and duplicating keys. Importing over an existing key replaces that key's value. Older keys retain the compatibility behavior described above.
Importing Gobo Raw DMX and preset scenes at different times switches the wheel representation at their respective keys, including when seeking backwards. Raw values retain numeric interpolation; preset selections remain stepped. Importing at an existing wheel key replaces its previous representation. Replacing a historical Raw key with a preset restores preset selection for that key without changing other keys.
Strobe mode and Shutter tracks use stepped changes; speed tracks support interpolation. Mode keyframes retain the mode name to resolve it across mode reordering and tag membership changes. See Strobe & Shutter.