Lesson 4.5: Building the Live Busking Cockpit
Warning
⚠️ Draft Lesson: This lesson is currently a working draft and is undergoing practical review. Technical labs, workflows, and diagrams may be expanded and refined in upcoming revisions.
During rehearsal and preparation, the lighting designer spends hours in the Device Patch, Scene Editor, and Node Graphs canvases: testing channel footprints, drawing Lissajous wave curves, and tuning audio FFT bandpass filters.
When the house doors open, the venue fills with hundreds of people, and the sound system powers up, your workflow must transform. You no longer have time to rewire nodes or inspect channel lists. You need a streamlined, high-level control cockpit where every physical fader, knob, and trigger pad gives immediate, tactile visual response.
In Unilighter, this live command center is the Live Dashboard.
In this lesson, we learn how to structure a low-fatigue dashboard, connect physical hardware MIDI controllers via Unilighter’s instantaneous Assign Mode, and establish professional operational habits to command intense four-hour live festival sets with total confidence.
1. The Live Dashboard: Performance vs. Engineering
In professional production, there is an absolute distinction between Engineering Screens and Performance Screens:
- Engineering Screens (
Device Patch,Scenes,Node Graphs): Complex, high-density workspaces designed for building assets, configuring addresses, and wiring mathematical logic. - Performance Screens (
Live Dashboard): Clean, spacious, high-contrast interfaces designed for high-speed live execution where buttons are large, levels are instantly readable from six feet away, and controls are mapped to muscle memory.
Engineering Mode (Pre-Show):
[ Node Graph Canvas ] ──> Wire complex LFOs, Math Nodes, Audio FFT, and Gate filters.

Performance Mode (Showtime):
[ Live Dashboard ]    ──> Expose only high-level macro faders, color triggers, and blinder bumps.
Unilighter’s Live Dashboard supports four primary live widget types:
| Widget Type | Typical Busking Role | Primary Controls |
|---|---|---|
DeviceControlWidget |
Group intensity, manual Pan/Tilt aiming, and chromatic color selection. | Vertical/Horizontal Faders, 2D XY Pads, Color Wheels. |
FunctionsWidget |
Triggering scenes, step chases, and toggling procedural Node Graphs on/off. | Push-button grid, Hold Mode (dashed bump borders), sequential cue stacks. |
NodeGraphWidget |
Exposing macro sliders and exposed knobs from background graphs. | Live parameter sliders connected directly to GroupInputsNode sockets. |
SimpleDeskWidget |
Emergency raw channel override bank for line checking and quick troubleshooting. | Direct 512-channel DMX fader bank. |
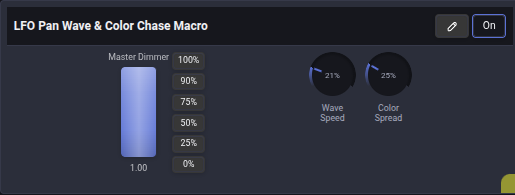
2. Hardware MIDI Integration: Tactile Muscle Memory
A computer mouse or laptop trackpad is a severe bottleneck during live music: you can only click one point on screen at a time.
Live show control requires physical tactile interaction: raising a group dimmer with your left hand, tweaking an LFO speed knob with your right hand, and tapping a blinder bump button on the downbeat with your thumb.
Unilighter natively supports standard USB MIDI hardware controllers—including fader banks, rotary endless encoders, and velocity-sensitive drum pads:

The One-Click "Assign Mode" Workflow
Mapping physical hardware to software controls in Unilighter takes seconds:
- Click the Assign Mode toggle button in the top navigation bar (the icon highlights blue).
- Click any on-screen control you wish to bind (a fader, knob, or button). The Assignment Modal opens:
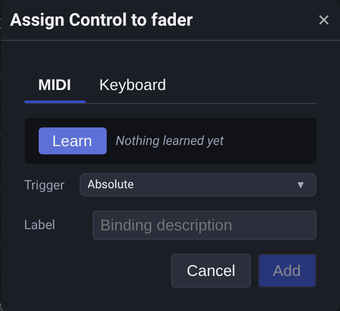
- Simply move a physical fader, turn a physical knob, or press a physical pad on your USB MIDI controller.
- Unilighter instantly detects the incoming MIDI message (Channel, CC Number, or Note), maps the parameter, and closes the dialog.
- Exit Assign Mode. Your physical hardware now commands the software parameter with zero perceptible latency!
3. Ergonomic Layout Architecture for Low Cognitive Fatigue
When building your physical controller layout, organize controls according to physical ergonomics and muscle memory:
+-------------------------------------------------------------------------+
|                  TYPICAL 8-CHANNEL BUSKING CONTROLLER                   |
+-------------------------------------------------------------------------+
| [Knob 1]     [Knob 2]     [Knob 3]     [Knob 4]     [Knob 5..8]         |
| Master Speed Tilt Trim    Color Speed  Strobe Rate  Audio Gate Thresh   |
|                                                                         |
| [Pad 1]      [Pad 2]      [Pad 3]      [Pad 4]      [Pad 5]    [Pad 6]  |
| Warm Amber   Teal / Cyan  Deep Magenta Acid Green   Blinder    Strobe   |
| (Palette)    (Palette)    (Palette)    (Palette)    (MOMENTARY BUMPS)   |
|                                                                         |
| [Fader 1]    [Fader 2]    [Fader 3]    [Fader 4]    [Fader 8]           |
| Grand Master Backline     Front Wash   Side Bars    Audience Blinders   |
| Intensity    Spots        Dimmer       Dimmer       Level               |
+-------------------------------------------------------------------------+
1. Left Bank: Master & Group Dimmer Faders
Keep master intensities on vertical faders. Your left hand naturally rests on these faders to smoothly pull down intensity during breakdowns and push energy back up during verses.
2. Center Knobs: Rate and Modulation Encoders
Use rotary encoders for continuous speed controls: global BPM multiplier, LFO cycle speeds, and audio gate sensitivity.
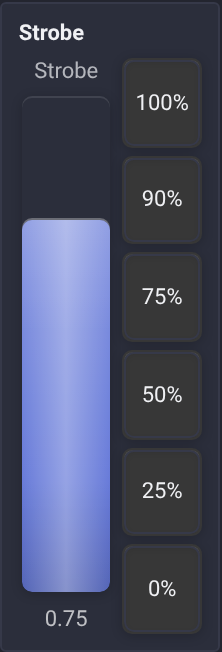
3. Right Pads: Momentary Blinder & Strobe Bumps
Map high-energy impact hits to physical velocity pads on your dominant hand side. Configure them as momentary hold buttons so releasing your finger immediately drops the fixtures back to running scene levels.
4. Live Operating Discipline: Surviving a 4-Hour Set
Operating a live festival or club show is an endurance discipline. Experienced LightJockeys follow five golden rules:
- Keep Your Eyes on the Stage: Never stare continuously at your computer screen. Look at the crowd, the performers, and the light beams in the room. Your physical controller allows you to adjust parameters by tactile feel alone.
- Never Show Your Entire Rig in the First Twenty Minutes: If you fire blinders, full-speed strobes, and maximum moving head sweeps during the first warm-up track, you have exhausted your visual vocabulary. Start subtle, restrained, and dark. Introduce new fixtures, colors, and motion patterns gradually as the headlining set progresses.
- Patience on the Drop: Do not pre-fire the strobe before the drop actually hits. Wait for Beat 1 of the drop; the instant the kick drum hits, explode the room with light. That sharp, millisecond synchronization is what creates goosebumps in the crowd.
- Embrace Darkness: A 5-second complete stage blackout during an intense acapella breakdown creates ten times more emotional impact than twenty moving lights spinning furiously.
- Redundant Hardware Fallback: If a USB MIDI cable is accidentally pulled or disconnected mid-show, don't panic. Unilighter remains 100% interactive via touchscreen, mouse, or trackpad on the Live Dashboard without missing a single DMX output frame.
5. Hands-On Lab: Building an 8-Channel Busking Dashboard
Follow these steps to build and verify your live busking cockpit in Unilighter:
Step 1: Open a Clean Dashboard
- Click Dashboard (
/#/dashboard) in the navigation bar. - Click Add Widget and select Device Control Widget.
- In widget settings, switch the mode to Tag Mode and select
#backline-spots. - Configure it to display a vertical master Dimmer slider and a Pan/Tilt XY pad.
Step 2: Add Macro Function Triggers
- Click Add Widget and select Functions Widget.
- Add four buttons mapped to your core color palettes (e.g.
Amber Warmth,Electric Teal,Deep Indigo,Monochrome White). - Add a fifth button mapped to your
Audio Kick Strobenode graph, configuring its mode to Hold / Bump (giving it a dashed active border).
Step 3: Connect Hardware via Assign Mode
- Click the Assign Mode icon in the navbar.
- Click the
#backline-spotsdimmer slider on screen. Move physical Fader 1 on your USB controller. - Click the
Audio Kick Strobebutton on screen. Press physical Pad 1 on your controller. - Click the Assign Mode toggle again to lock assignments.
Step 4: Live Rehearsal
- Raise physical Fader 1: observe your stage lights smoothly illuminate.
- Tap physical Pad 1: observe the audio-reactive strobe fire on the beat and vanish the millisecond you release your finger.
- Your live busking cockpit is fully operational, responsive, and primed for showtime.
📝 Self-Assessment Quiz
Test your understanding of dashboard construction, MIDI mapping, and live busking operations:
- Scenario A: During a live concert, an operator attempts to command 30 moving fixtures entirely using a laptop trackpad. Why does this physical interface create a severe operational bottleneck during dynamic musical drops?
- A) Because standard computer trackpads broadcast wireless radio interference that destabilizes RS-485 balanced line receivers.
- B) Because a computer mouse or trackpad can only interact with a single screen coordinate at a time, preventing simultaneous multi-parameter adjustments like raising group dimmers while punching a blinder bump.
- C) Because laptop operating systems throttle DMX512 frame generation to 5 Hz whenever a trackpad button is held down.
- D) Because trackpads lack the high-voltage electrical transformers required to strike discharge arc lamps.
Correct Answer: B Why this is correct: A mouse or trackpad is inherently single-pointer. Live show control requires multi-finger tactile interaction (e.g. riding master intensity with one hand while hitting flash bumps with the other), which is why physical MIDI hardware controllers are standard practice. Why other options are incorrect: Trackpads do not emit RF interference that disrupts DMX cabling (A); DMX frame streaming runs independently in background threads (C); and lamp striking is handled by high-voltage igniters inside the fixture chassis (D).
- Scenario B: What is the correct workflow in Unilighter to instantly map a physical MIDI fader on an external hardware controller to a dimmer slider on the Live Dashboard?
- A) Edit the console's internal C++ source code file and manually recompile the application binary.
- B) Toggle Assign Mode in the navbar, click the desired on-screen control to open the Assignment Modal, move the physical hardware fader to auto-detect its MIDI CC, and exit Assign Mode.
- C) Solder a 120-ohm resistor between the MIDI 5-pin DIN connector and the USB bus interface.
- D) Manually calculate the hexadecimal binary offset of the MIDI channel and type it into a terminal command prompt.
Correct Answer: B Why this is correct: Unilighter’s Assign Mode provides one-touch hardware learning: toggling Assign Mode, clicking the target control, and moving the physical fader or pad automatically captures the MIDI message and binds the control. Why other options are incorrect: Recompiling source code (A) is unnecessary; 120-ohm resistors (C) are DMX transmission line terminators, not MIDI components; and manual hexadecimal entry (D) is obsolete.
- Scenario C: Why is visual restraint (such as intentionally leaving audience blinders and full-power strobes dark during early set songs) considered a hallmark of professional LightJockeying?
- A) Because DMX512 opto-splitters overheat and shut down if high-intensity parameters are active for more than fifteen minutes.
- B) Because without contrast and negative space, audience sensory perception becomes saturated, causing later musical drops to feel visually flat and unimpressive.
- C) Because venue electrical meters penalize high-intensity lighting cues with 3-phase harmonic distortion fees.
- D) Because moving head stepper motor lubricants dry up if luminaires are operated above 50% brightness in early hours.
Correct Answer: B Why this is correct: Visual perception relies on contrast. If the rig is blasting at 100% capacity during early warm-up tracks, there is no visual headroom left for peak musical drops, resulting in emotional fatigue. Why other options are incorrect: Opto-splitters handle digital data and do not overheat based on parameter intensity (A); utility billing does not track lighting cue levels (C); and fixture mechanics are rated for full-power continuous operation (D).